• Site Map
  • Contact Me
  • About Me

Pat's Cross-Stitch Corner

A Place to Share a Craft I Love

Qsnap Cover a.k.a. Grime Guard Covers

March 27, 2015 By patgeary

I just this past year started using Qsnap frames to keep my fabric taut when stitching.

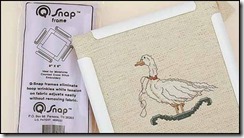
qnap-frame

Q-Snap frames provide an alternative to traditional hoops and frames. Composed of PVC type tubes and corners, fabric can be draped over it and held in place by a "C"-shaped clamp on each side. ~ Is the Q-Snap Frame Better for Counted Cross Stitch?

I have various sizes of Qsnaps (both the name brand and those available from Michael’s Craft stores) that I use for the different sizes of fabric. You can also buy extensions to create even more sizes. You can try Making your own PVC lapstand by following these instructions.

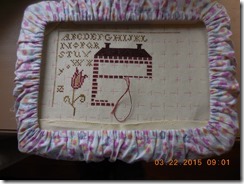
Once you have placed your fabric within the Qsnap frame you can begin stitching BUT make sure you hands are clean to avoid getting stains on your fabric.  Grime Gard Qsnap Covers  can be used to keep your stitching clean and free of oils and other soiling. You can also tuck in the extra fabric to keep it out of your way while stitching with Q-snap frames. I have ordered the covers in various sizes to fit the frame configurations I use.

2015-03-22 09.01.27

However, you may choose to make your own by following the tutorial written by Abbie’s Sewing & Stuff – Qsnap Cover a.k.a. Grime Guard Covers.
Filed Under: Tutorials

Gridding your Fabric for Cross Stitch

January 13, 2014 By patgeary

I recently joined the Message Board offered by one of my favorite places for order cross stitch supplies and learned a trick that I wish I had known about many years ago. A bit of history first. I recently started stitching The Wolf Pack for my youngest son. The design uses many shades of grey, black, and blue and I kept getting confused as to where I was. I had read about gridding your fabric as part of a recent thread on the board and thought I might give it a try to see if it worked.

I always mark the center of both the design and fabric when I start stitching and work from the center either up or down. This time I decided to start stitching at the top left-hand corner because of the design itself. See Wolf Pack for more on this particular project. I then counted up 20 lines and added a line of running stitches horizontally every 20 lines just so I could count. Then counted over to where the first stitch would go. I used plain ole sewing thread (red) to mark the lines. Worked OK to start but still kept having difficulty so went back and marked every ten lines horizontally. This helped so decided I needed to know more about marking my fabric in this manner.

NOTE: This would have been much easier to do BEFORE I started stitching then afterwards!!!

Here are some of the links I found that helped:

An Rx for a Worldwide Epidemic | Just One More Stitch (jeanfarishneedleworks.com)

http://www.stitchingthenightaway.com/75/gridding-your-fabric-for-cross-stitch/

http://cross-stitch.livejournal.com/556458.html

http://pinwheelponders.blogspot.ca/2009/01/some-thought-on-stitching-cross-stitch.html (scroll down)

http://www.scarletquince.com/gridding.php

Most of the charts I work on have a darker line every ten stitches both horizontally and vertically. So, this is what I did:

1. Mark the center of the design on the chart and the fabric. Count up to the first darker horizontal line and stitch all the way across your fabric. Repeat in both directions for the entire width of the fabric.

2. Count over to the first dark vertical line and stitch a vertical line the entire height of the fabric.

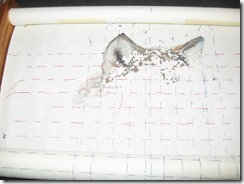
wolf-gridded

The design so far with what I had stitched and the grids in place.

August 2022 – I have continued to grid my fabric over the years as my eyesight has gotten worse. I now use red fishing line 4 or 6lb test. I also now grid any project large or small.

Filed Under: Tutorials

Blackbird Designs Addict.

Recent Posts

  • Beautiful Things
  • Stitching Quaker
  • The Sweet Birds Sing
  • Gifts of the Season
  • St. Patrick’s Day by Primrose Cottage

Categories

  • Blackbird Design News
  • Box Toppers
  • Christmas Ornaments
  • Drums
  • Finished Works
  • Ladies Prim Society
  • Miscellaneous
  • News
  • Pictures
  • Projects to Stitch
  • Samplers
  • Small Finishes
  • Strawberries
  • Tips
  • Tutorials
  • Victorian Motto Sampler Shoppe
  • Wall Hangings
  • Wish List
  • Works In Progress (WIP's)

Counted XStitch Designers

  • Blackbird Designs
  • Country Cottage Needleworks
  • Crossed Wing Collection
  • Little House Needleworks
  • Lizzie Kate
  • Shepherd's Busch Fine Needlework
  • The Prairie Schooler

Favorite Links

  • 123 Stitch
  • Graphik Dimensions
  • Rensel Studio – Custom Picture Framers
  • Victorian Motto Sampler Shoppe

Fine Art Cross Stitch

  • Kustom Kraft
  • Scarlet Quince

Finishing Techniques

  • Framing Cross Stitch
  • Home Framing: Lace Method Tutorial
  • Make a Greeting Card
  • No Sew Wall Hanging
  • Pinwheel Ponders Finishing Techniques
  • Special Shaped Ornaments Finishing from The Twisted Stitcher

Hand Dyed Fabric

  • Enchanting Lair
  • Hand Dyed fabrics by Stephanie
  • Picture This Plus
  • Under the Sea Fabrics

My Other Sites

  • Expression Web Tutorials, & Templates
  • Family Genealogy
  • Genealogy Web Creations

Tutorials

  • Blending Colors
  • Joining Two Pieces of Fabric

WordPress Links

  • Documentation
  • Plugins
  • Support Forum
  • Themes

Administration

  • Log in
  • Entries feed
  • Comments feed
  • WordPress.org

Header Image

The header image at the top is Rainbow Row in Charleston SC. The chart itself is a design by Barbara and Cheryl. You can view the finished piece Rainbow Row.

Subscribe to Blog via Email

Enter your email address to subscribe to this blog and receive notifications of new posts by email.

Join 103 other subscribers

Copyright © 2025 · News Pro Theme On Genesis Framework · WordPress · Log in